 |
Fred
Brack Raleigh, NC |
|
|
|
Fred
Brack Raleigh, NC |
|
This is not a full tutorial on the Document Object Model (the DOM is HUGE!) but rather an introduction and reference to its basic features and how use them. Want more detail? Try Mozilla; and my favorite reference site is W3Schools. I created this web page to help me document my understanding of the DOM as I progressed from novice to intermediate user ... and because I like to document stuff for others! I hope you find it useful.
The Mozilla organization describes the Document Object Model this way:
The Document Object Model (DOM) is a programming interface for HTML and XML documents. It represents the page so that programs can change the document structure, style, and content. The DOM represents the document as nodes and objects. That way, programming languages can connect to the page.
And there's our connection to JavaScript! We use the DOM in our JavaScript coding when we want to access or modify elements of a page of HTML. Note, however, that we are only going to discuss the DOM re HTML, not XML documents.
When we create a page of HTML, we can consider the file of HTML to be a document. We can read (view) it as a document or let a browser interpret the HTML tags, etc., to produce the desired text and imagery on a screen. The DOM is an object-oriented representation (model) of the web page. So put those three bolded words together and you get Document Object Model, hereafter referred to simply as the DOM. The DOM is not a programming language: it is simply used by one (JavaScript in our case, but there are others).
All HTML elements are objects, and those objects, as usual, have properties and methods. They also have one other unique characteristic: events (not discussed here).
Before we get into the gory details, here is how can you use a DOM method (write) to write some text out onto your website at whatever point in your HTML you invoke the JavaScript:
document.write("It is easy to write text from JavaScript!");
You can also imbed HTML in your write statement:
document.write("It is <i>easy</i> to write text from JavaScript!");
If you use JavaScript to determine the current year, you can easily write it out to your document as part of a copyright statement at the bottom, for example:
<p>Copyright
<script>
var time = new Date();
var year =time.getFullYear();
document.write(year);
<script>.</p>
| PLEASE NOTE! "document.write" is NOT the recommended way to write to a web page. (See why not.) We only show it here as a quick testing method. The better methodology is to define an "id" in a document tag, reference it, and write to it. For example, if "year" is the current year: loc = document.querySelector("#copyright"); loc.insertAdjacentHTML('afterbegin',year); (Reference: insertAdjacentHTML below) |
Before working with individual features of the DOM, it is important to understand its structure and terminology. Each HTML element (tag) is called a node. The DOM is a tree structure, with the initial <html> tag (called the root node) at the top of the tree. Typically it will have two other nodes below it: <head> and <body>, and each of them will have nodes below them. Nodes lower down the tree (like <head> below <html>) are called child nodes, and each child has a parent node (<html> in this example). Any node that falls anywhere below another node is called a descendent node. For example, any paragraph tag (<p>) in the document is a descendent node of both <html> and <body> at a minimum. Tags that appear at the same level (for instance two paragraphs in a row) are called sibling nodes. And finally, any node containing a text string (like our paragraphs) is called a text node. You will find an example of a DOM structure on this Mozilla page called Manipulating Documents. SUGGESTION: Reread this paragraph until you are comfortable with the terminology!
Your objective is to find certain HTML elements to either extract their values or more likely modify them. While there are several methods available for accessing the HTML tags, we are only going to demonstrate one here, which can be used instead of the older ones, such as document.getElementById and document.getElementByTagName. We mention them only because you may see them in existing JavaScript code. The newer, all-encompassing method is called querySelector. As you look at these examples, think about CSS. A selector is any characteristic of the HTML you want to address and modify: a class, an ID, the tag name, or more (thus the getElementByxxxxxxx methods above). Here is one line of HTML from a document:
<h2 class="h2class">Heading</h2>.
So for our first example, the selector will be a class named h2class, which in terms of how you specify it in its CSS definition would be ".h2class" (that is, you must precede a class name with a period), so we need to do that here also:
var className = ".h2class";
const h2Node = document.querySelector(className);
// The above statement returns a reference to the first node (tag) in the document with class="h2class"
Now that you have stored the reference pointer, you can use it to modify the document:
h2Node.textContent = "New Heading";
So we used the DOM method querySelector to locate the first occurrence of a node (tag) with a specified class (h2class); then we modified the text that occurs within that tag using the property textContent. Had we preferred instead to simply address the first h2 tag, then the selector would have been "h2" (the actual tag name) instead of ".h2class", and the result of modifying via textContent would have been the same because both got us to the h2 tag. Make sure you understand this example before continuing!
Taking another pass at selector identification, suppose the HTML in question looked like this:
<p>I recommend this website: <a id="website" href="tbd">also tbd</a></p>
We want to locate the link tag (<a>) via its id (website) and modify both the href and the text associated with the link. Here's how:
const linkNode = document.querySelector("#website); // note the # to identify an id, as in CSS
linkNode.href = "https://www.mozilla.org/";
linkNode.textContent = "Mozilla";
// ... which turns the original line of HTML into the following:
// <p>I recommend this website: <a id="website" href="https://www.mozilla.org/">Mozilla</a></p>
There is a variation of querySelector named querySelectorAll which matches every element in the document that matches the selector and stores the result in an array-like object called a NodeList. Also, the selector can be complex, like "p.highlight" (which means the first paragraph with 'class="highlight"') or by specifying multiple selectors (like "h2, h3") which means it applies to the first h2 or h3 it finds.
textContent is a little more involved than it might seem; so here is an example from one of my own projects. (It does include the concepts discussed in Using AJAX to Access Another Web Page Using the DOM.) I needed to take apart list-items which include a link, movie title, and information about the movie. textContent truly extracts only the text from the list-item node, removing any imbedded HTML for you. Here is a sample list item (shown here split on two lines, which might or might not happen in the real file, but which turns out to be important):
<li class="pgmtitle"><a href="https://www.netflix.com/title/80211686" target="_blank" rel="nofollow">Grand Army</a>
[Netflix Series; Drama; rated TV-MA]</li>
My objective was to return only the movie title and the information in brackets (shown in bold above). textContent does that.
// htmlObject contains the entire HTML from another web page (reference link above)
// We pick off only list-items with a class of "pgmtitle"
const nodeArray = htmlObject.querySelectorAll(".pgmtitle"); // place those listitems in an array
// Note that the array elements are objects, not text strings
let nTotal = nodeArray.length; // calculate the NUMBER of list-items
for (n=0; n<nTotal; n++) { // loop through the array of list-items
  let line = nodeArray[n].textContent; // extract text only (with any \n's included)
  // next step would separate the title from the description by searching for the left bracket ...
So what does line now look like? Well, it depends on exactly how the original line of HTML is coded. Basically it returns "Grand Army [Netflix Series; Drama; rated TV-MA]" -- but there's a catch! The way I showed the example, there is a newline indicator before the left bracket. You wish to scan for it or imbedded blanks (because the second line might have spaces in front). To remove blanks, use trim. For the newline character, you will look for "\n". In your testing, you can use console.log(line) to see what you get, keeping in mind that the newline character will generate a line break. If you want to see this code in action, visit my Netflix page and select the "Netflix Titles by Rating" option. And here is the Javascript that runs that page.
Now that you know how to grab an anchor in the HTML (some identifiable tag called a node), let's look at how you could add new HTML to your document. For instance, you might create an entire web page from JavaScript by identifying the <body> tag and inserting HTML after it. You are going to do this with:
For purposes of our example, we will look for whatever tag on our page has id="insert" associated with it.
// First create the content; then locate where to insert; then insert it
const para = document.createElement('p'); // NOTE:  just p, not <p> ...
para.innerHTML = 'This is the content I want to <b>insert</b>.';  // after <p>...
const insertPoint = document.querySelector('#insert'); // the id of a tag after which I will insert
insertPoint.appendChild(para); // remember our definition of child
Note the use of innerHTML property (sometimes called an attribute). You could have used textContent, except that no HTML tags are permitted with it, so this may be a better approach.
As an aside, there is also a property called outerHTML, which means the entire HTML node and its contents (that is, the <p>...</p> in our example) will be accessed or replaced. However, I learned from experience that you cannot set an element's outerHTML attribute unless the element has a parent (which it won't have if you just used createElement to create the node).
An alternative approach is to create one HTML element, then another, and connect them together with appendChild prior to insertion in the document somewhere. You could imagine creating lots of different, but perhaps related, lines of text this way within a JavaScript loop, for example.
const h2hdr = document.createElement("h2");
const title = document.createTextNode('This is Heading 2'); // stands alone at the moment
h2hdr.appendChild(title); // now connect the title text to the h2
document.body.appendChild(h2hdr); // this adds the h2 to the bottom of the bodyThe concept expressed above (creating new HTML) is so important and useful that I think a more extensive example would be helpful. First, it is important to note that you can use createElement and appendChild together without ever actually modifying your existing HTML. Why is that important? It is how you could build and connect two or more HTML tags and their contents prior to inserting them in your document. In our example, we will build a list-item consisting of some text ("Chapter n") and a (dummy) link; then we will insert the completed list-item in our list framework (an unordered list, <ul>) already in our HTML document. The list is empty because we are going to build it in the JavaScript by accessing the DOM. We simply need to be able to point to the list. I have chosen to use an ID, because IDs are supposed to be unique; but you could just as well reference the one <ul> in the document by its tag name: ul.
<body>
<h2>Chapter List</h2>
<ul id="titlelist">
</ul>

<script>
document.write("Started OK...<br />");
const list = document.querySelector('#titlelist'); // find the "<ul>" by its id
const text = "My List Item ";
var i; imax = 3;
for (i=1; i<=imax; i++) {
  listItem  = document.createElement('li'); // create list item "<li>...</li>"
  link      = document.createElement('a');  // create link "<a>...</a>"
  link.href = "dummyurl.com/chapter"+i;     // populate the link with the href ...
  link.textContent = "Chapter "+i;          // and the link text
  listItem.appendChild(link); // now append the link to the list item
  list.appendChild(listItem); // and append the completed list-item after the ul
}
document.write("Ended OK...");
</script>
</body>
Why did I include those two document.write statements? Simply to verify for me that I was successfully executing the JavaScript. And by the way, I verified that I was creating the HTML I was expecting by invoking the console debugger in the browser via Ctrl-Shift-I and clicking on Inspector. In part, the output looks like this in the Inspector:
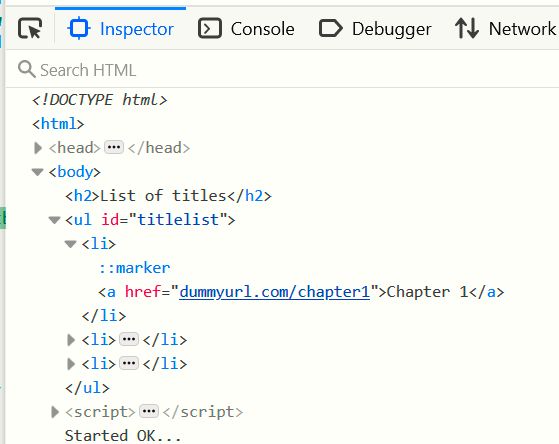
If you are wondering why "Started OK" appears below the list instead of above, it is because the list was modified in-place, and the document.write(s) occurred after the original list placement was determined.
Based on my own experience, here's another method you might wish to consider. To simplify, I already had preformed <li>...</li> statements that I wished to present in a new order. I started with a small variation of what is documented above, attempting to use outerHTML to replace a <li> element in full; but someone on stackoverflow.com gave me a better alternative called insertAdjacentHTML. Basically it gives you four different placement options for a preformatted string of HTML (like I had or you could create) in an existing document:
element.insertAdjacentHTML(position, text);
where position is one of the following (with quotes as shown):
Visualization of position names:
<!-- beforebegin -->
<p id="mynode">
<!-- afterbegin -->
existing text, if any ...
<!-- beforeend -->
</p>
<!-- afterend -->
Note: The beforebegin and afterend positions work only if the node is in the DOM tree and has a parent element.
So what I had was a dummy unordered list in my new document:
<ul id="ulist">
</ul>
The objective was to insert the existing fully-formed <li>...</li> pairs into the list above. It was as simple as first pointing to my list (node id), then repeating the insertAdjacentHTML statement for each iteration of my pre-existing pairs using the 'beforeend' option to keep adding to the end of the list:
 const myList = document.querySelector("#ulist"); // node ID of the UL in current doc
...
// Loop through setting 'li' to the pre-existing <li>...</li> pairs
myList.insertAdjacentHTML('beforeend',li)
CAUTION: Do not attempt to insert HTML tags which require end-tags by themselves, or the end-tags will be inserted for you! For example, if you are building table entries, do not write out a "<tr>" alone; construct the complete contents all the way through the ending "</tr>" first. The example shown above had both the start and end-tags of a list-item, so it was not a problem.
NOTE: If you are inserting only text (no imbedded HTML) you can use insertAdjacentText instead.
You can move nodes/tags around or delete them. Once you have identified a node via querySelector (or some other method) and identified a receiving location in a similar manner, you can use those references as follows to move the node (and any children):
newLocation.appendChild(oldLocation)
This effectively moves what is at the oldLocation to the newLocation. If your objective is to delete the node (and its children), then you would code:
oldLocation.remove();
The easiest way to modify a style (normally handled via CSS) would be via the style property as follows, which addresses the initial header we identified above as h2Node:
h2Node.style.backgroundColor = "red";
DO NOTE that while the style words are the same as CSS, instead of hyphenation you must use camelCase here! That is, CSS's background-color becomes backgroundColor.
On the other hand, if you already have a CSS class defined either in your document or in a linked CSS file, you can associate that class with any document node that you have already identified via setAttribute. So, for example, if you have defined a background color class named "yellowbg" in your CSS, you can apply it to your h2Node as follows:
h2Node.setAttribute("class","yellowbg");
You may also do the opposite: removeAttribute; or find out if a node has a certain attribute by using hasAttribute (which returns true or false). By the way, it is not recommended to use setAttribute with "style" as the first operand, as any styles already in place will be deleted. However, any attribute name may be specified as the first operand. For example: href for a link or type for a button.
There are hundreds of DOM methods, so I'm just documenting a few additional ones here. I'll probably add more over time ...
<h2 id="h2id" class="h2class">This Is My Header</h2>

h2 = document.querySelector("h2"); // point to the first <h2> in the doc
h2.id; // = h2id
h2.className; // = h2class
h2.tagName; // = H2
// Now reiterating the difference between two previously mentioned methods
h2.innerHTML; // = This Is My Header
h2.outerHTML; // <h2 id="h2id" class="h2class">This Is My Header</h2>

// Feel free to suggest additional methods for inclusion here!
| There are MANY more DOM properties, methods, and object collections I have just touched on a few to get you started! |
# # # # #
Fred