 |
Fred
Brack Raleigh, NC |
|
|
|
Fred
Brack Raleigh, NC |
|
One of the most frustrating aspects of Apple's support of photos on their iDevices is that Apple insists that the only sequence in which you can present your photos is date-timestamp order. This means that if on vacation you take a photo of a sign after you visit a building, you can't move that photo before the others taken inside, and you can't build "title slides" and integrate them at the right spot.
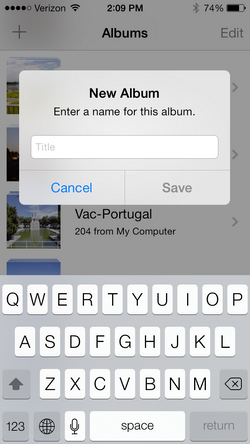 The
solution is create an "album" on your iDevice, in which you can change
the order of presentation. An album consists of pointers to the actual
photos stored elsewhere. Here's how you do it.
The
solution is create an "album" on your iDevice, in which you can change
the order of presentation. An album consists of pointers to the actual
photos stored elsewhere. Here's how you do it.
Now here's how I personally take and organize photos. When on vacation, I take most of my shots with a digital camera, supplemented by some on my iPhone. Back home, I load all the photos onto my laptop computer in a new subdirectory in the Pictures folder named "Vac-" followed by the name of the vacation spot. For example: Vac-Portugal. NOTE: I would prefer to put all my vacation photos in a Pictures subdirectory named Vacation; but when syncing with iDevices, Apple only honors one level of subdirectories, which is why I developed the "Vac-" prefix for vacation photos by location.
Then I use a graphics program to create some title slides the same size as the photos and stick them in the folder, too. To organize the photo order on the host, I change the filenames, but this would be an optional step. As a reminder, when these photos are moved to an iDevice, the filenames are irrelevant because the order reverts to date-timestamp.
Now, using iTunes, I include this new photo subdirectory in the list of Picture files to be synced with my iDevice. The Vac-Whatever directory now appears as a photo album in the Photos app. I use the method outlined above to create a new, similarly named Album (suffixed with -X, for example, to distinguish the name as an iDevice album versus a folder with photos); and I go through the process of moving the individual pictures into the correct order.
Now I can use AirPlay to display all the photos and titles slides in the correct order using my Apple TV interface.
REMEMBER: An iDevice album is just a set of pointers to the real photos. If you delete the real photos, you lose the photos from your new album. Also, these albums do not sync between iDevices. Be sure to create your new album on the particular device you want to use to show your photos. In my case, that would most likely be my iPad versus my iPhone.